
Setting Up Review for Office Documents
Our Document Review allows you to review:
Microsoft Office documents (Word, Excel, PowerPoint)
OpenOffice/LibreOffice documents (Writer, Calc, Impress)
Google Workspace documents (Docs, Sheets, Slides)
PDF documents
PDF review works right out of the box. For Office documents, we convert the uploaded documents to PDFs and display the PDFs for review. This requires some initial setup.
There are two components that need to be set up:
A message broker. RabbitMQ is the recommended message broker, though any of Celery’s supported brokers should work.
If you already have a message broker set up, you can use it here. Follow the steps below for using an existing RabbitMQ instance.
At least one instance of Doc Converter, our document conversion microservice.
If you’ve set up Review Bot before, this process is very similar.
There are two different ways that you can set up the components needed for reviewing Office Documents:
Launching the Doc Converter image itself using docker run.
Launching Doc Converter along with a message broker and/or other services using docker-compose.
Once the necessary components are installed, you’ll need to configure the Document Review feature.
After that, you’ll be ready to start reviewing documents!
Using Docker Run
Set Up a Message Broker
First, you need to have RabbitMQ (or another compatible message broker) configured and ready. The message broker can be installed on the Review Board server or on another system, depending on your needs. You can use an existing Docker image or install a broker manually. Refer to the broker’s documentation for installation instructions.
Here is an example of setting up and running a RabbitMQ Docker container:
$ docker pull rabbitmq:3-management
$ docker run -P \
      --hostname rabbitmq \
      --name powerpack-docconverter-rabbitmq \
      -e RABBITMQ_DEFAULT_VHOST=docconverter-vhost \
      -e RABBITMQ_DEFAULT_USER=docconverter \
      -e RABBITMQ_DEFAULT_PASS=pass123 \
      -e RABBITMQ_ERLANG_COOKIE=somecookie \
      rabbitmq:3-management
This is just an example, in practice you’ll need to set your own values. We’ll go over the configurations for these in detail below.
Use an Existing Message Broker
Or, if you already have a message broker (for example, if you’re using Review Bot), you can use that.
For an existing RabbitMQ instance, you will need to to create a separate virtual host that the Doc Converter workers will connect to, and optionally a separate user.
Run these steps in your RabbitMQ instance to create a new user and virtual host:
$ rabbitmqctl add_user 'docconverter' 'pass123'
$ rabbitmqctl add_vhost docconverter-vhost
$ rabbitmqctl set_permissions --vhost docconverter-vhost docconverter ".*" ".*" ".*"
You can then follow the rest of the steps below, making sure to replace the hostname and port used in the examples with the hostname and port for your RabbitMQ instance.
Set Up Doc Converter
To set up and run a Doc Converter Docker container, run:
$ docker pull beanbag/docconverter:latest
$ docker run -P \
      --name docconverter \
      -e BROKER_URL=amqp://docconverter:password123@rabbitmq:5672/docconverter-vhost \
      -v /path/to/fonts:/usr/local/share/fonts/custom:ro \
      beanbag/docconverter:latest
See below for how to configure the values used in the examples above.
Setting your own values
The values used in the examples above need to be set to your own configuration and security requirements. We’ll go through the settings and describe how they should be set:
hostnameThe hostname for the RabbitMQ container.
RABBITMQ_DEFAULT_VHOSTThe RabbitMQ default virtual host to use for Doc Converter.
RABBITMQ_DEFAULT_USERThe RabbitMQ default user to use for Doc Converter.
RABBITMQ_DEFAULT_PASSThe RabbitMQ default user password to use for Doc Converter. Use a strong password!
RABBITMQ_ERLANG_COOKIEThe RabbitMQ Erlang cookie to use for Doc Converter. Use a secret string of up to 255 alphanumeric characters.
BROKER_URLThe broker URL for connecting to the message broker. Change this according to your RabbitMQ and Docker variables above. The URL should be in the following format:
amqp://[user]:[password]@[hostname]:[port]/[vhost]-v /path/to/fonts:/usr/local/share/fonts/custom:roAn optional volume mount for custom fonts.
Doc Converter ships with open-source fonts that cover most document styles. However, if your documents use proprietary fonts such as Microsoft fonts, you may notice some slight visual differences from how they appear in Microsoft Office.
You can make fonts available to Doc Converter by mounting a directory containing the font files into the container. Replace
/path/to/fontswith the path to a directory that contains your font files. If you don’t need custom fonts you can remove this line entirely.Important
Any time new fonts are put into the directory, the Doc Converter container must be restarted to apply the fonts to the font cache.
Once you’ve ran the commands with your own values, you can move on to configuring the Document Review feature.
Using Docker Compose
docker-compose can help you define and launch all the services needed for Document Review.
See our sample docker-compose.yaml files for examples on how to launch
RabbitMQ and Doc Converter alongside your Review Board server. Carefully
read the instructions in the README.md and in the comments of the
example files. This will guide you on tailoring the docker-compose.yaml
to your own configuration and security requirements.
Once you’ve tailored the docker-compose.yaml to your own values and
brought up the environment, you can then move on to configuring the
Document Review feature.
Configure the Document Review Feature
This is the last bit of setup needed to get Document Review for Office documents going:
Go to the Extensions page.
This can be found in Administration UI -> Extensions.
Go to the Power Pack configuration page.
Look for Review Board Power Pack and click Configure.
Under Manage Features, click on Set up document review to go to its settings page.
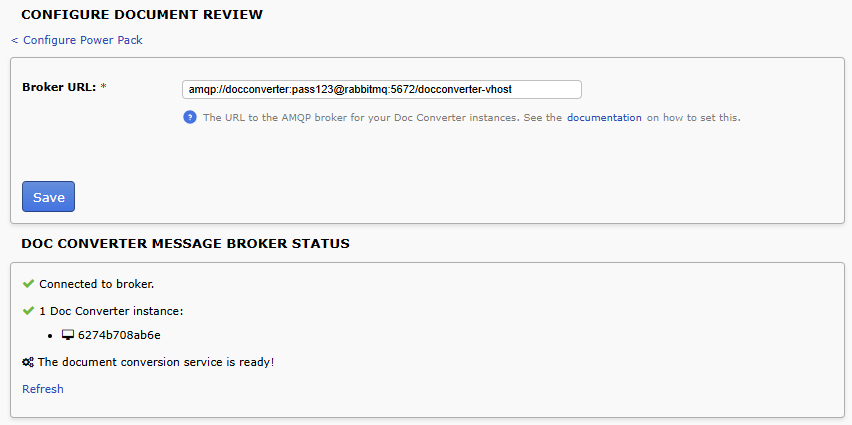
You’ll need to set the Broker URL to the URL of your RabbitMQ or other Celery broker. The URL should be in the following format and configured to your RabbitMQ and Docker variables:
amqp://[user]:[password]@[hostname]:[port]/[vhost]Following the examples above, you would set the this to:
amqp://docconverter:pass123@rabbitmq:5672/docconverter-vhostFollowing our sample docker-compose.yaml files, you would set this to the same value as the BROKER_URL in the docconverter container configuration.
Click Save.
The page will attempt to contact the message broker and check for any Doc Converter instances. If everything has been set up correctly, the Broker Status box should now list the available Doc Converter instances and indicate that the Document Review feature is ready.
Now you are all set to start reviewing Office documents!